

Some of you may only have a production org. If that sounds like your work style and you’re 100% happy with the way things are going, this blog post is not for you. But, if you’re looking for a way to improve your operations, a sandbox or developer org may be just what you need. If that’s the case, keep on reading.
The folks at Salesforce have this to say about the topic: “Non-configuration changes, such as creating new views, reports, and dashboards, can be made safely directly in production. But other changes…are potential pitfalls of confusion and productivity. Understanding the downstream impact of a change, whether it’s preparing for a new user experience or updating an existing integration, are vital steps to minimize disruption and increase feature adoption.”
In other words, smaller changes, like those of the non-configuration variety, can be made in production with little to no impact. Other changes that update the user experience or functionality of existing features should be made in a sandbox to allow you to build and test without disrupting your users.
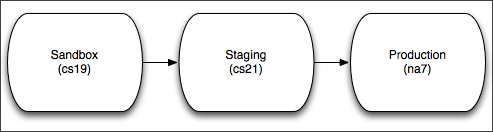
Step One: The Sandbox
I recommend that, if you don’t have one already, you get yourself a sandbox. If you have an old sandbox that hasn’t been used in some time, refresh it so that it’s current. This sandbox is an ideal environment to perform updates, develop new functionality, and test out the new release of Salesforce. Working in the sandbox ensures that your users in production won’t be affected by your changes until you want them to be. Once you’re ready for your work to go live, create a deployment plan and a changeset. Using changesets gives you a record of when and what you pushed to production.
Note: The Enterprise edition of Salesforce comes with a complimentary developer sandbox. Additional sandboxes are available at an additional fee. There are also multiple versions of sandboxes, which brings us to this common question:
How do I know what type of sandbox(es) I need?
Developer Sandboxes allow for development and isolated tests while providing a copy of the production org’s configuration (metadata).
Developer Pro Sandboxes are intended for the same use as the Developer Sandbox, but have a larger storage limit which allows for larger data sets and better testing. These are better environments for development, and if you don’t have a Partial Copy or Full Sandbox, these work great for QA and staging.
Partial Copy Sandboxes have a copy of the production environment’s configuration metadata as well as a subset of the production data. This allows for testing with real data and can also be used for training. These are great as a Quality Assurance environment–at Red Argyle, we run all QA tests and perform UAT here. If we do not have access to a Full Copy Sandbox, we also use the Partial Copy Sandboxes for staging to test our deployments.
Full Sandboxes support all types of testing: performance, load, and staging. This is an exact replica of your production environment, configuration metadata, and data. The downside to a Full Sandbox is that the refresh interval is once every 30 days. These are great as staging environments where you can test your deployments and perform more robust tests.
Visit the Salesforce Sandbox Overview for additional details on all of these types of sandboxes.
Step Two: A UAT/Staging Org
If you have the resources, I suggest you get a UAT or staging environment. This gives you and your customers/clients the chance to test the new functionality while you or your development team can keep banging away in the sandbox without affecting the ongoing tests. Use a changeset to push from sandbox to the UAT/staging org. This provides an opportunity to practice your deployment process, allowing you to iron out any kinks along the way. Make sure you add anything to the deployment plan that will help with your push to production. Not only will it be useful now, but it may also be helpful down the road when you encounter the same or a similar scenario.
Step Three: Production
Now you’re ready to deploy. Your deployment plan is bulletproof. You ran all your tests in the sandbox or staging environment, and you’ve validated your changeset. Ready, set, deploy. Minus the config that you’ve defined in your deployment plan, you’re live and your functionality is ready for your customers/clients. You can feel confident about the quality of your work, because you took a few extra steps to ensure you release a quality product.
The Alternative: Production Only
So you’ve got a handful of non-configuration or similar changes that you want to make directly in production. No problem–have at it. However, keep in mind that if you make changes directly in production, they won’t be readily available in your sandbox. If you need to rely on any of these changes in your other environments, you should keep a log of what’s been done directly in production. Then, either deploy or recreate them in your sandbox or testing environments as needed, when a sandbox refresh is not an option.
Salesforce has a Trailhead module dedicated to Application Lifecycle Management, and I suggest you check it out. Red Argyle strongly advocates for the usage of sandboxes. We do not conduct developer operations without a proper application management strategy in place to protect your data and business process. If you’re interested in getting some help in setting up an application lifecycle strategy for your company, we invite you to reach out to us today.