

If you’re like most Salesforce Admins/Users, you haven’t quite yet made the full jump into Lightning Experience. And that’s okay. It’s hard to move away from something you’ve known and loved for so long. (We love you, Salesforce Classic!) But I’m going to add weight to the scale that’s beginning to lean very heavily in favor of Lightning Experience. Drum roll please… SALES PATH. “What’s Sales Path?” you ask? Well sit back, and prepare yourself for Lightning awesomeness.
Sales Path is a customizable section at the top of a Lead or Opportunity record that’s available in Lightning Experience only. It provides users the information they need to quickly and accurately move through a sales process. More specifically, Sales Path allows users to focus on one stage at a time. That area of focus is so specific that Users know exactly what needs to be done, and they can move Leads and Opportunities faster through the pipeline. To achieve this, Sales Path uses “Key Fields” and “Guidance for Success” sections that are customizable for each stage.
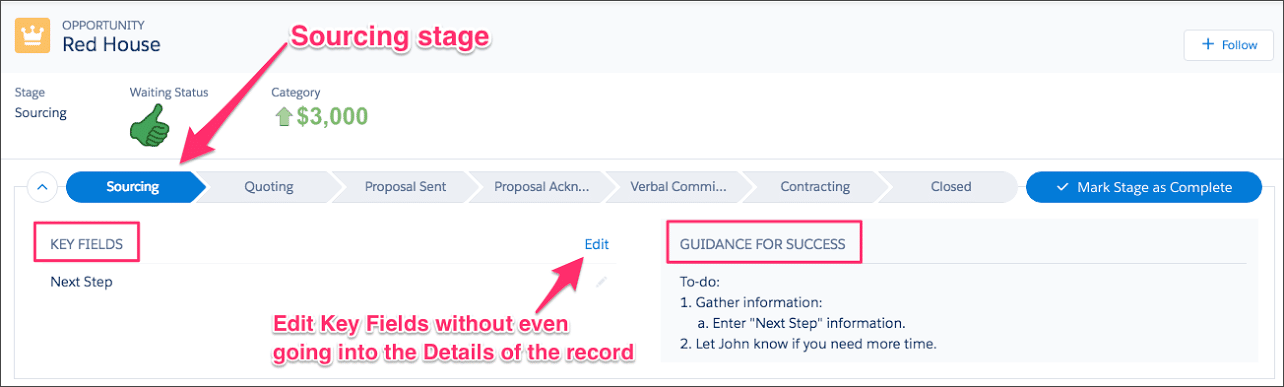
In the example above, you can see that this Opportunity is in the first stage, called “Sourcing.” While in the Sourcing stage, the key field that I, as the sales rep, need to focus on is “Next Step.” Keep in mind that this key field(s) can be edited right from the sales path without even needing to enter the Details view of the record. Huge thumbs up!! This means your sales reps probably don’t ever need to even navigate away from the sales path on a record. You can also see in the example above that I have two “to-do” items in the “Guidance for Success” section. During configuration, this section is just a big text box, so I can write out helpful text, provide a link to a best-practice document or Chatter post, or even boost morale by offering words of encouragement to the sales reps. Gooooooo, sales reps!
Configuring Sales Path is a cinch. Remember–prior to creating a sales path, you need to already have your Lead statuses and Opportunity stages finalized. To begin, click Setup -> Customize -> Sales Path -> Enable. Click on “New Sales Path,” and select the record type. Your stages will be automatically pulled into the sales path. This next step is the fun part. Specify the key fields that sales reps need to complete (or reference) for each stage, along with whatever fun stuff you want/need to put in the “Guidance for Success” section. That’s it! The last step allows you to save and finish later or to activate now. Once activated, your sales path will automatically be available to your users without any additional configuration.
You’re mindblown, aren’t you? I know–I’m pretty excited too. Here are a couple of things to keep in mind while you are considering if Sales Path is a great fit for your company. Sales Path for Lead records is currently ONLY available at the desktop level in Lightning Experience. Sales Path for Opportunities is also available on Salesforce1. If your sales path is not showing up, make sure you are using the right Record Type and that it is active. You can have as many sales paths as you have Record Types for Opportunities (yay!). And, for best performance, Salesforce recommends that you create a sales path for sales processes that have 20 or fewer stages.
What are you still doing reading this blog post?! Go log into your dev org (or you can create one here), and start playing around! Sales Path brings the fun and greater efficiency to sales. It’s just another reason why Salesforce’s Lightning Experience is winning us over. And if you already have your own success stories with Sales Path, drop us and our readers a note below!