In the first article of our three part series on GitHub, we provided an overview of the benefits of CI on Salesforce. As well as why we’re implementing our infrastructure with Github. This article will take a deeper dive into the features, lifecycle, and tools that we use for our pipeline.
We are a Salesforce Partner that builds complex, custom, and weird Salesforce solutions. Having a dynamic, flexible, and reliant DevOps infrastructure is critical for our stakeholders and our organization.
Github Actions
Github Actions, which became available to the public on November 19th, 2020, provides an easy mechanism to automate workflows. Such as CI/CD, testing, and deploying directly from Github (where developers live already).
With Github Actions, you can kick off any number of your project’s workflows from these events in Github. When practicing source-driven development, these events can take place in a code repository a development team is working with. These events are very common across the software development industry and thus allows for a standardization of Source Repository practices.
Breaking Down the Github Action
What is a Github Action?
Similar to systems like AWS Lambda or Google Cloud Functions, GitHub Actions provides a container based approach to running a workflow, or a configuration of steps to perform a specific task. These steps are executed on a “runner”, or a cloud-based instance designated to carry out your task.
NOTE: GitHub provides you with a basic pricing model for their on-platform runners, but also allows you to define custom runners for your workflows.
More information about GitHub actions can be found here.
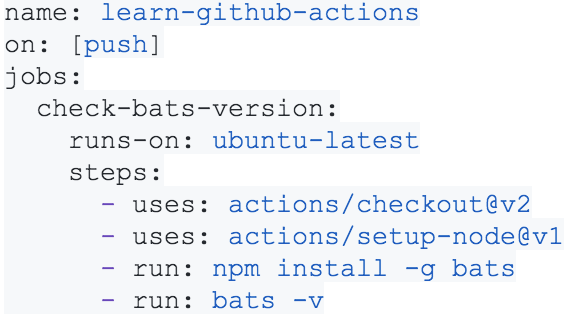
An example workflow may look something like this:

We have a number of private Github actions built by us to perform the tasks of our CI/CD pipeline.
Our Github Actions and Related Tools
- rad-sfdx-cli-action
- This action is the core of our Salesforce integration with GitHub, which handles the authentication of a specific Salesforce instance within the target repository, and allows us to perform commands using the sfdx-cli tool.
- rad-ci-action
- The primary “integration test” or continuous integration action. This action takes the changes in a pull request and runs a validation deployment to the previously authenticated Salesforce instance. We can use this to check for things that normally may be ignored when deploying between dev orgs, but may be important when deploying that same code to a production instance later on.
- rad-pmd-action, rad-eslint-action
- Similar to the rad-ci-action, these actions take the changes made in the PR and runs them through both ESLint and PMD (Static Code Analysis) scans, to ensure code quality and standards are upheld throughout the organization.
- rad-metrics-action
- This action allows us to track quality and metrics across our GitHub environments by performing any of the previous scans or checks on a set time cycle. We can monitor certain data points like number of failing tests, number of errors/warnings within the code, and use that data to ensure we are delivering quality code all the time.
Continuous Integration Lifecycle
Now that we’ve discussed a few of our specific lifecycle events that trigger GitHub Actions, let’s take a step back and look at the full continuous integration lifecycle.
This chart, as simple as it may appear, has some complex components running behind the scenes using Github Action workflows. More information about these behind-the-scenes parts will be provided later in this series.
For now, let’s look at how your Salesforce org structure plays into GitHub Actions. And also how you can improve your structure before implementing this continuous integration lifecycle.
Before beginning, one of the most important steps, is to ensure that each developer is writing code within their own developer-sandbox or scratch org environment. This step is vital to the process to ensure that anyone working within the org is not stepping on the toes of other developers or overwriting code changes being worked on.
Another big step in this process for developers is to break up your code into smaller pieces of work. Opening a pull request for 10,000+ lines of changed code makes it much harder for others to review your code. It’s easier to find a needle in a smaller hay stack.
At Red Argyle, we use a very simple and very effective git-flow outlined in the diagram below:
This is just an example of the process we use on most of our projects. Every project is going to be different and may require a different approach. This example provides you with how we structure and manage the changes across dozens of projects to easily integrate with our CI/CD pipeline. The creation of the pull request is a vital part of this process when working with Github Actions, as it serves as the trigger to kick off the processes defined.
Be on the lookout for our third and final entry in our GitHub Series! Next, we will be diving even further into the technical pieces of GitHub. As well as giving some tips and directions on how to use it. If you have any questions, feel free to contact us!


